Upload an image
In WordPress, you can work with images in different ways. You can:
- upload a new image
- select a pre-uploaded image
- set a featured image in a news article.
Following is information on how to perform all of these functions.
Upload a new image
To insert an image in a page, follow these steps.
Open the page you would like to insert the image into.
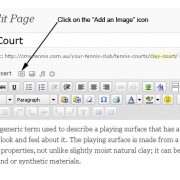
 Put your cursor in the spot where you would like the image to be inserted. Click on the “Add an Image” icon in the tool bar (pictured right).
Next, click on the “Select Files” button (if you are using the Flash Uploader) or click on the “Browse” button if you are using the Browser Uploader.
Select the image you would like to use from your computer, then click on “Upload”.
Note: images that appear in a page can have a maximum width of 410 pixels and should have a resolution of 72 dpi. If you are uploading images for a photo gallery, we suggest an image no bigger then 1024px wide. For more information on images, read our Images and Graphics for the Web page.
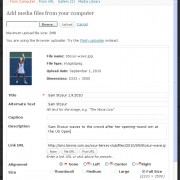
A thumbnail of your image will appear along with the following fields (pictured right), which you need to fill out:
-
 Title: the image title – this is the title of your image that will be displayed in the Media Library.
 - Alternate Text: this appears when you hover your mouse over an image. It is required by law to ensure that your website is accessible to people who are sight impaired.
- Description: the description is an image’s caption. This is the text that will accompany your image in photo galleries and news articles.
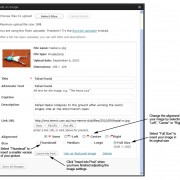
 When you have finished filling out these fields, select your image size (Thumbnail, Medium, Large or Full Size) and the alignment (None, Left, Centre or Right) (pictured left).
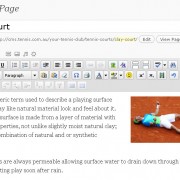
Your image is now inserted into your page (pictured right).
To remove an uploaded image, click on the image and select the “Delete Image” icon.
Select a pre-uploaded image
First, place your cursor where you would like to insert your pre-uploaded image.
From the tool bar, click on “Add an Image”.
Next, select Media Library from the menu at the top of the “Add an Image” box.
Here you can view your pre-uploaded images and perform searches for particular images.
To select an image, click “Show” to view the image’s details.
Click the “Insert into Post” button.
Your image should appear in the Visual Editor.
To remove the uploaded image, select the image and click the “Delete Image” icon.
* Note: click on images to expand them.
This Chapter Upload an image
Published in CMS Next Chapter Upload a PDF, Word document or Excel spreadsheet ↑ Top